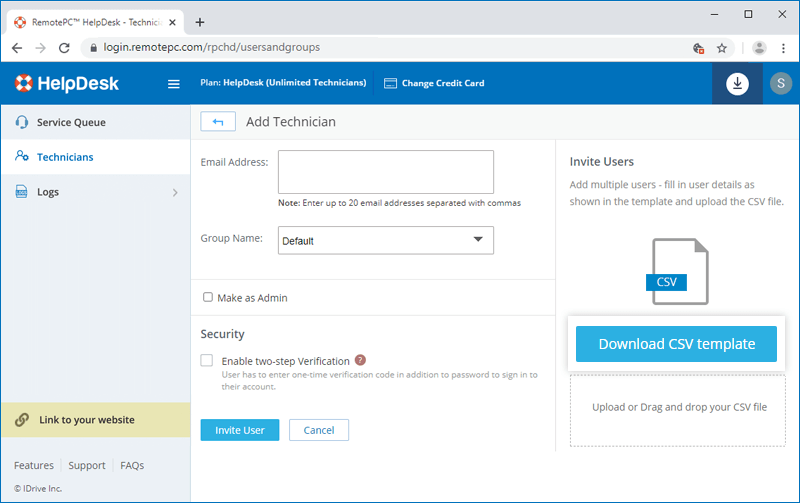
To add technicians,
- Login to HelpDesk via the web browser.
- In the 'Technicians' tab, click 'Add'.
- Enter the email addresses of the technicians you want to add, assign a group, grant administrative rights, or enable two-step verification.
- Click 'Invite User'.
Yes, you can add multiple technicians to your account at a time by uploading CSV file.
To invite technicians,
- Login to HelpDesk via the web browser.
- In the 'Technicians' tab, click 'Add'.
- Click the 'Download CSV template'.
- Open the file, delete the sample entry and add the information for your technicians in any of the following formats (one line per user):
"EmailAddress,GroupName,AdminPreferences,2FA"

"EmailAddress;GroupName;AdminPreferences;2FA"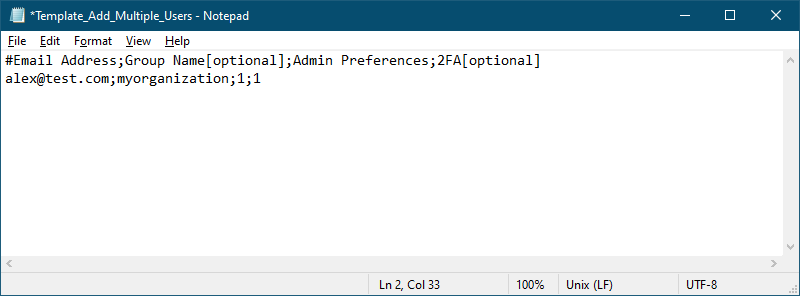
- Save the modified file.
- Drag and drop your saved CSV file onto the 'Upload or Drag and drop your CSV file' area. Alternatively, click the area to browse for your CSV file and upload.
- In the popup that appears, click 'Add Technicians'. A confirmation message appears after adding the users.
Note: You can add up to 500 technicians at a time using the CSV file.
The invited technicians will get an email with the link to register to RemotePC™ HelpDesk. Once they register, their account will be added to your account.
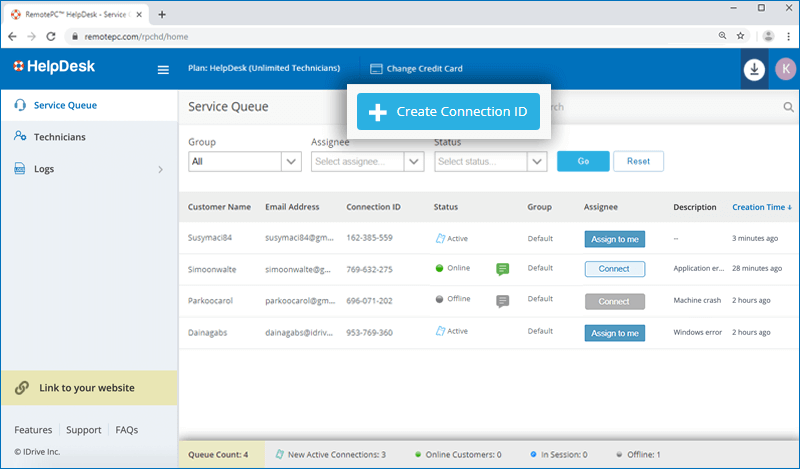
Admins, as well as any technician of a HelpDesk account, can create a 'Connection ID' to access the customer's computer and provide remote support.
To create a 'Connection ID',
- Login to HelpDesk via the web browser.
- In the 'Service Queue' tab, click 'Create Connection ID'.
- In the pop-up that appears, enter the customer information, details of the query, and assign a technician.
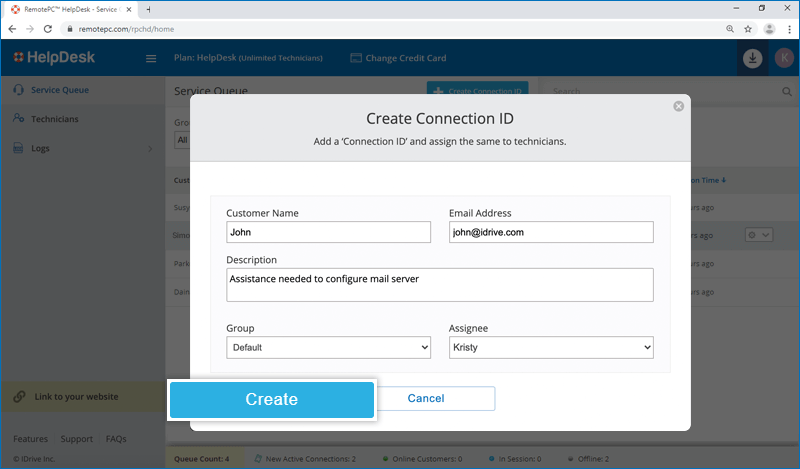
- Click 'Create'. The Connection ID will be generated.
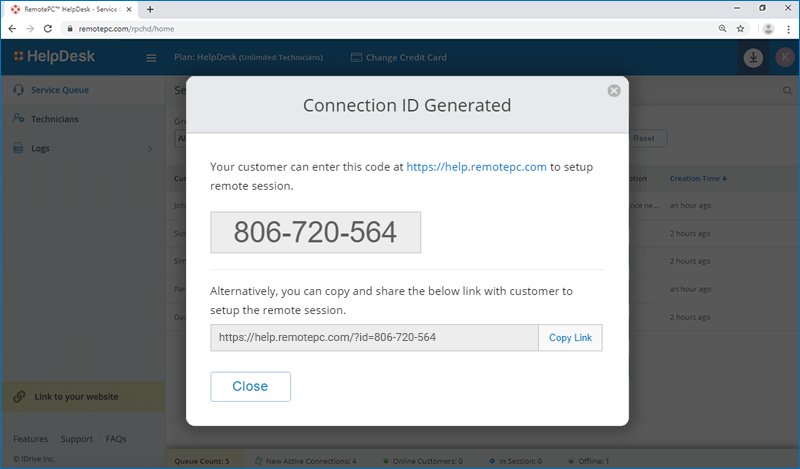
- Copy the code or link and share it with the respective customer. Customers can open the shared link or enter the shared code at https://help.remotepc.com.
- The HelpDesk setup will be downloaded and a chat window will appear on their computer, from where users can exchange messages with the technician.
Once the customer installs the downloaded setup on their computer, you can establish a remote connection with the computer and provide remote support.
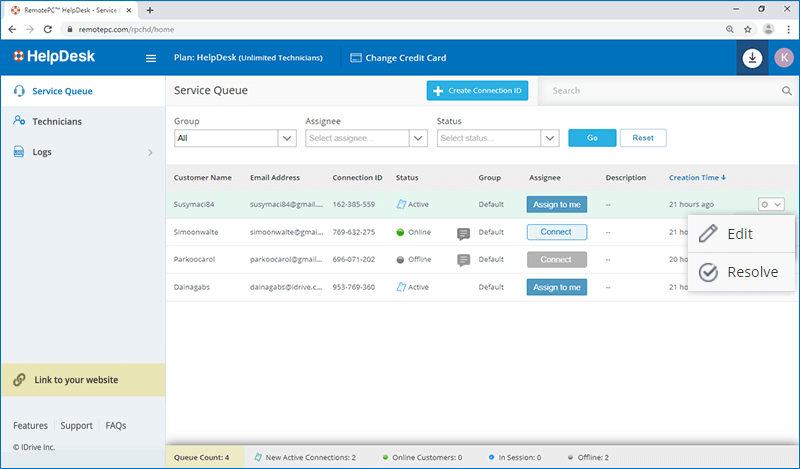
All created connection IDs are listed in the 'Service Queue' tab of the dashboard. The details of assigned Connection IDs, corresponding to different customer requests, the technicians to whom they are assigned, and the status of the same can be viewed from this tab.
To assign a Connection ID,
- Login to HelpDesk via the web browser.
- On the 'Service Queue' tab, click
 against a particular Connection ID.
- Click 'Edit'.
- Update the description or modify the 'Group' and 'Assignee'.
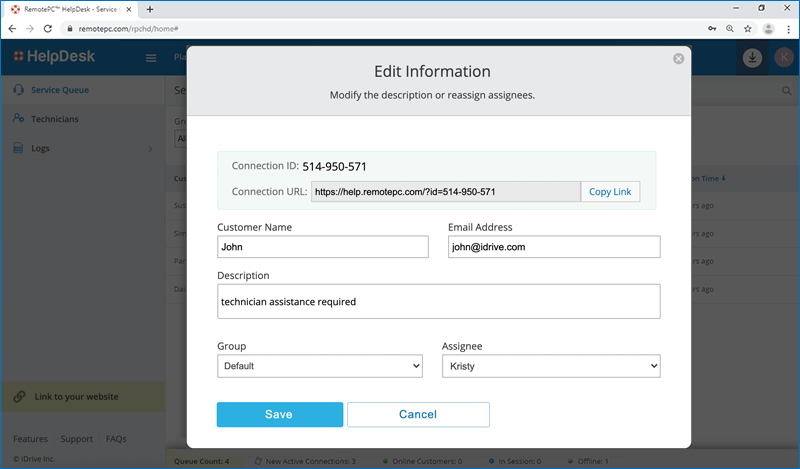
- Click 'Save'.
To create a group,
- Login to HelpDesk via the web browser.
- In the 'Technicians' tab, click the 'Create Group' button.
- Enter the group name and click 'Create'.
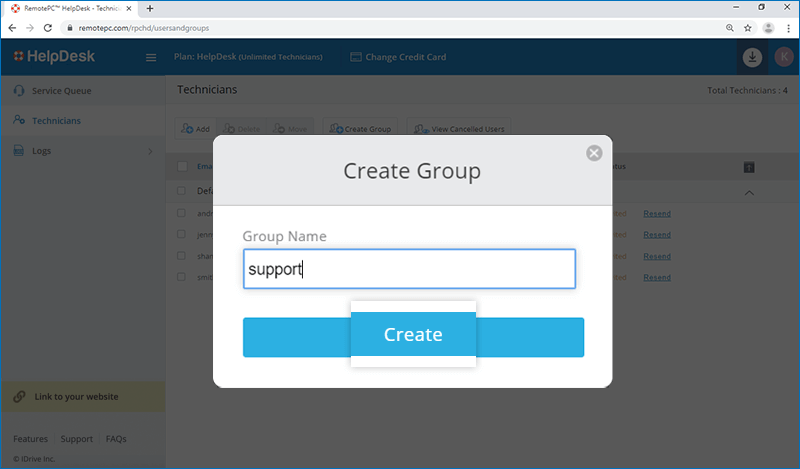
Once this is completed, you can add technicians to the created group.
To add technicians,
- In the 'Technicians' tab, click
 on the right-hand side, corresponding to the group where you want to add technicians.
 - In the pop up that appears, enter the email address and click 'Invite'.
Note: You can assign admin rights to a technician and enable two-step verification by selecting the appropriate checkboxes.
To move technicians between groups,
- In the 'Technicians' tab, select the technicians you wish to move, using the corresponding check-boxes, and click 'Move'.
- Select the 'Group Name' you wish to move the technician to from the drop-down menu.
- Click 'Move'.
You can view logs of all activities from the HelpDesk web interface.
The 'Web Activity Logs' tab displays logs of all web-based activities, whereas the 'Remote Access Logs' tab displays logs related to remote access activities. You can view group and individual technicians' activity logs as per the timeline specified.
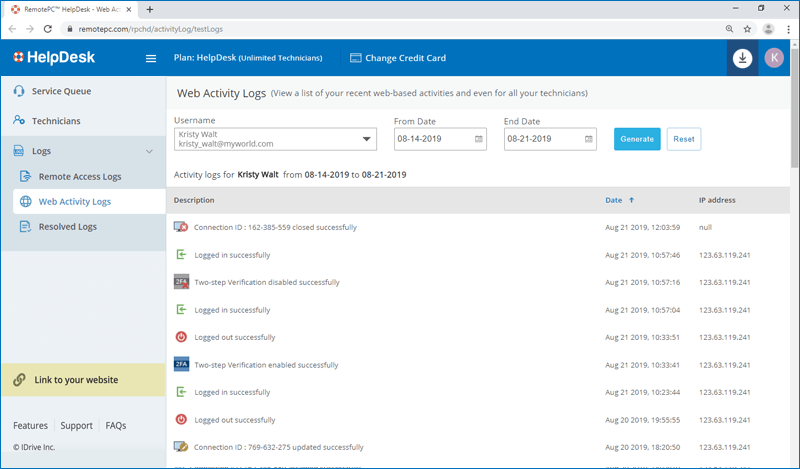
You can also view logs of all the resolved Connection IDs from the 'Resolved Logs' tab. In this tab, you can also view logs for a particular group, assignee and time period through appropriate selections in the drop-down menu.

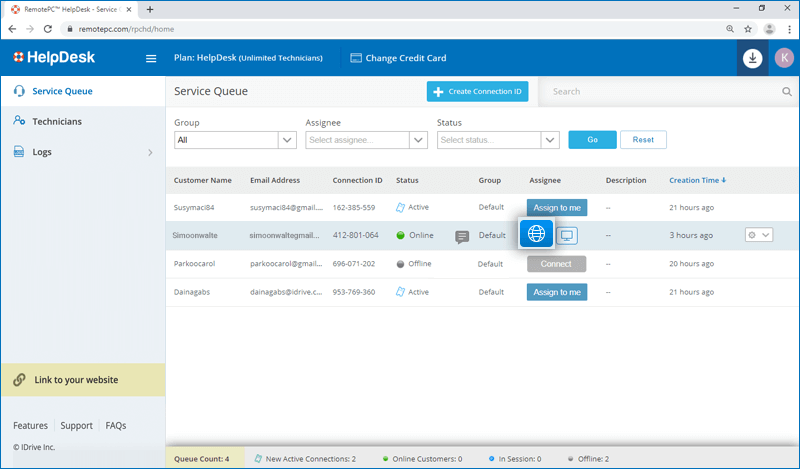
To view Connection IDs that have been assigned to you and their status, go to the 'Service Queue' tab. You can also view Connection IDs which have not been assigned to anyone. You can self-assign it by clicking the 'Assign to me' button, to begin working on the Connection ID.
Yes, you can begin working on a Connection ID from a web browser, via HelpDesk Viewer Lite or by downloading the HelpDesk app launcher.
To connect via HelpDesk Viewer Lite,
- Login to HelpDesk via the web browser.
- In the 'Service Queue' tab, hover over the 'Connect' button corresponding to a particular Connection ID. Click
 and a remote support session will be initiated.
To connect via HelpDesk desktop application,
- In the 'Service Queue' tab, hover over the 'Connect' button corresponding to a particular Connection ID. Click
 .
.
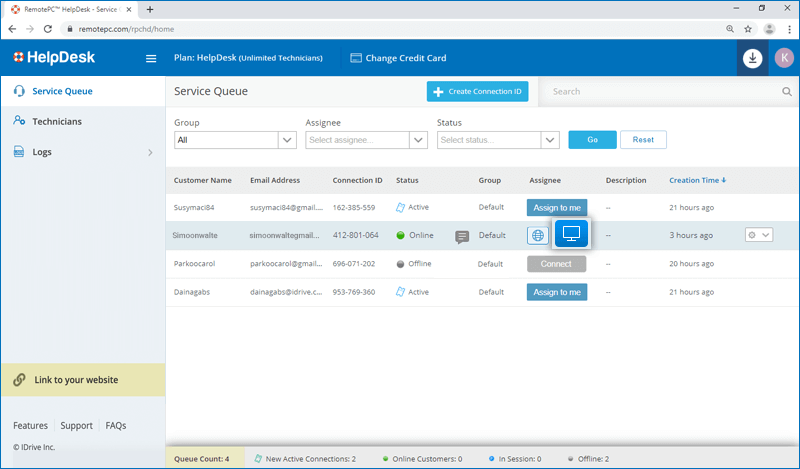
- Download and run the HelpDesk app launcher, to access the customer's computer remotely.
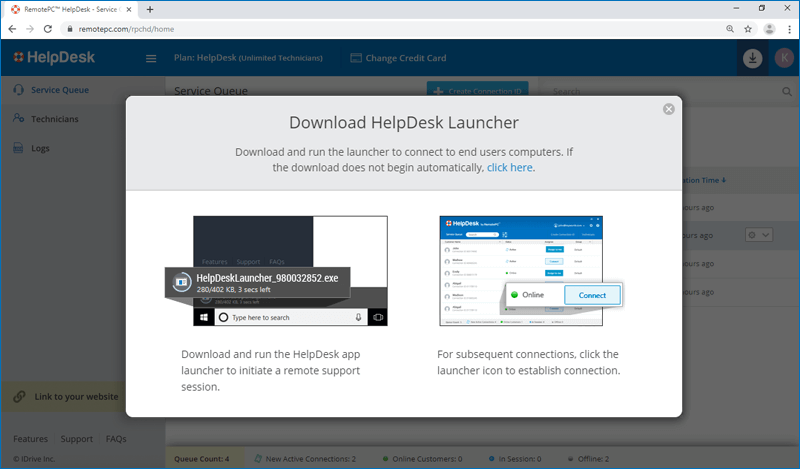
For subsequent remote support sessions, simply click
to establish a connection.
Yes, you can work on a Connection ID that has not yet been assigned to anyone. The list of all Connection IDs are displayed in the 'Service Queue' tab.
To self-assign a Connection ID,
- Login to HelpDesk via the web browser.
- In the 'Service Queue' tab, click the 'Assign to me' button against a particular Connection ID.
Once this is completed, the Connection ID will be assigned to you.
You can close the Connection ID by marking it as resolved. You can select this option once the Connection ID has been attended to.
To close the Connection ID,
- Login to HelpDesk via the web browser
- On the 'Service Queue' tab, click
 against the Connection ID you want to resolve.
 - Click 'Resolve'.
- In the pop-up that appears, click 'Yes'.
To initiate chat,
- Login to HelpDesk via the web browser.
- In the 'Service Queue' tab, click
 against an online Connection ID to exchange messages with the customer.
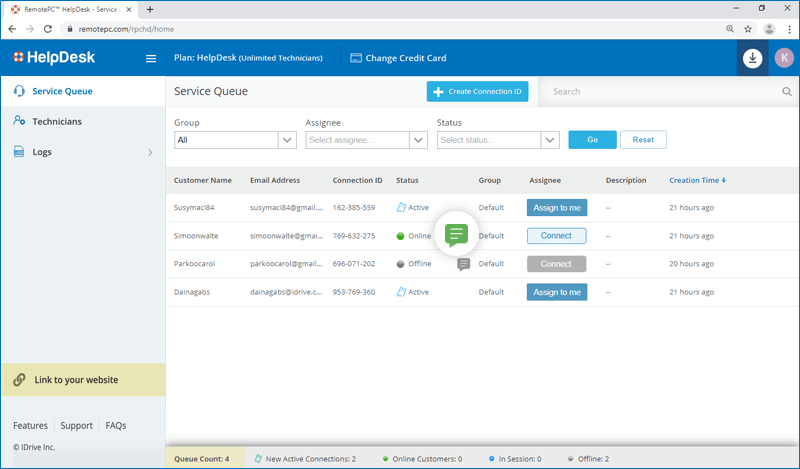
Note:
- You will not be able to chat unless the Connection ID is assigned to you.
- Technicians part of the same group will be able to view the chat only if the Connection ID is assigned to them. Once assigned, the chat history will also be made available to the technician to better understand the issue at hand.
Yes, you can initiate a video call from the chat window.
To make a video call,
- In the 'Service Queue' tab, click against an online Connection ID to exchange messages with the customer.
- Click
 in the chat window.
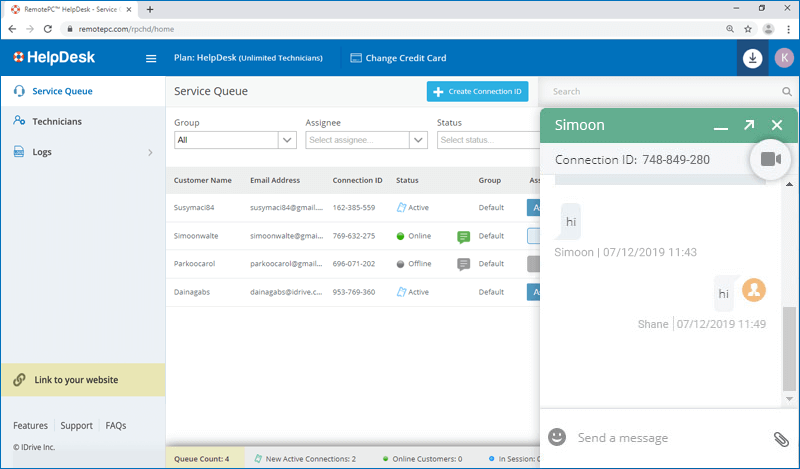
- Click 'Allow', when prompted, to grant access to your computer's camera and microphone.
Note: If microphone and camera are not available, you can initiate text chat only. - Once the customer accepts your call request, the video call will begin.
- Click
 to end the call.
Yes, you can transfer files to and from the customer's computer with required permissions.
To transfer files to the customer's computer,
- Login to HelpDesk via the web browser and establish a remote connection with the customer's computer.
- Click
 to expand the menu bar in HelpDesk Viewer Lite.
- Click
 . The file explorer will appear.
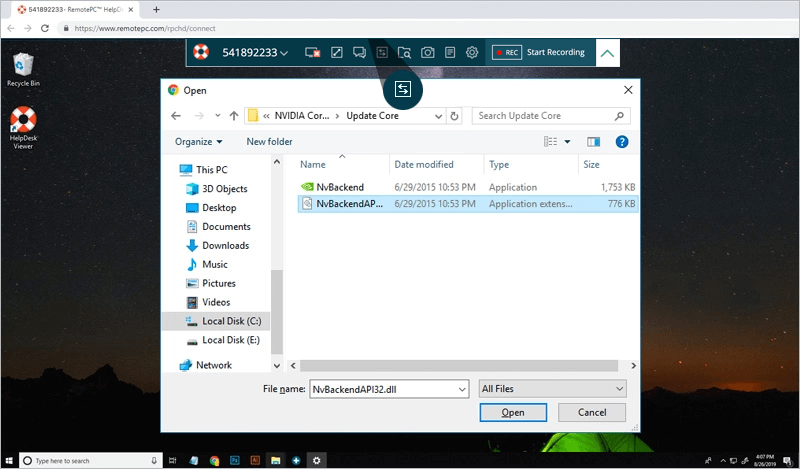
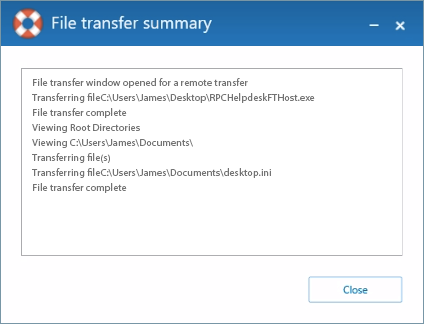
- Select the file you wish to transfer and click 'Open'. The customer will receive a request to download the file.
Note: Only one file can be transferred at a time to the customer's computer.
- Once the customer accepts the request, the selected file will be downloaded. A success message will appear on completion of the file transfer.
- Click on the success message to view a summary of the file transfer.
Note: This functionality is currently not available for EDGE browsers.
To receive files from the customer's computer,
- Login to HelpDesk via the web browser and establish a remote connection with the customer's computer.
- Click to expand the menu bar in HelpDesk Viewer Lite.
- Click
 . The file browser panel will appear.
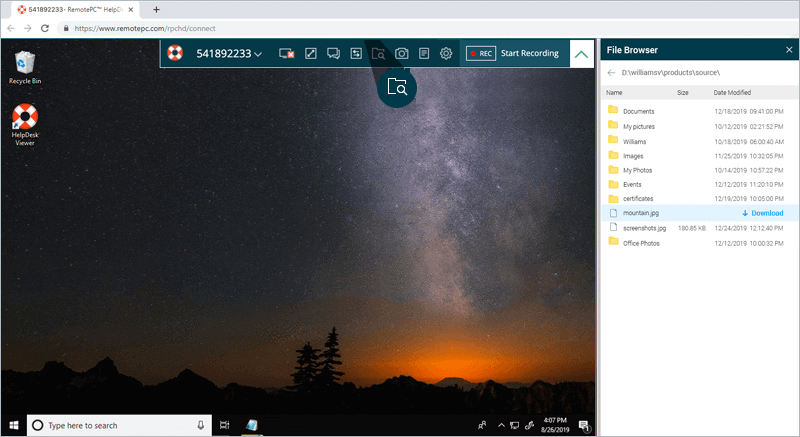
- Click 'Request Access' to send a request to the customer.
- Once the customer accepts the request, a tree view of the files on the customers' computer will be displayed in the panel.
- Click on the file you wish to receive and click 'Download'. A success message will appear when the file is transferred to your computer.
Note: Only one file can be transferred at a time from the customer's computer.
- Click on the success message to view a summary of the file transfer.
Note: This functionality is currently not available for EDGE browsers.
Yes, you can take a snapshot of the screen of the customer's computer or save a recording of the session and save it for future reference.
To take a snapshot,
- Login to HelpDesk via the web browser and establish a remote connection with the customer's computer.
- Click
 to expand the menu bar in HelpDesk Viewer Lite.
- Click
 .
The screenshot will be saved.
.
The screenshot will be saved.
To record a session,
- Login to HelpDesk via the web browser and establish a remote connection with the customer's computer.
- Click to expand the menu bar in HelpDesk Viewer Lite.
- Click 'Start Recording'.
- The recording will be saved automatically once the session ends. You can also click 'Stop Recording' to end recording the session and save it.
Note: This feature is currently not supported for Mac as a host.
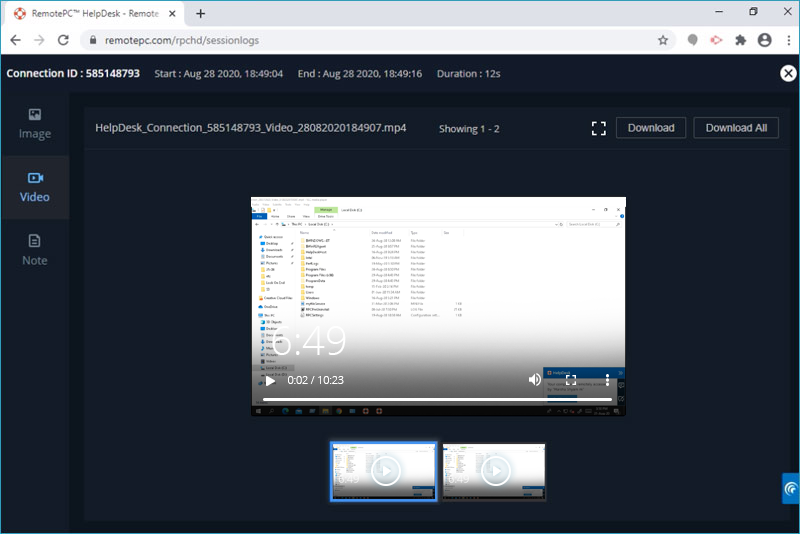
To view the saved screenshots and session recordings in the future,
- Login to HelpDesk via the web browser.
- Go to the 'Remote Access Logs' tab, and click
 against the logs for the particular Connection ID.
- In the 'Images' tab, click 'Download' to save the selected screenshot or click 'Download All' to save all the screenshots as a .ZIP file in the default download location of your web browser.
- In the 'Video' tab, you can view the session recordings saved for the Connection ID.
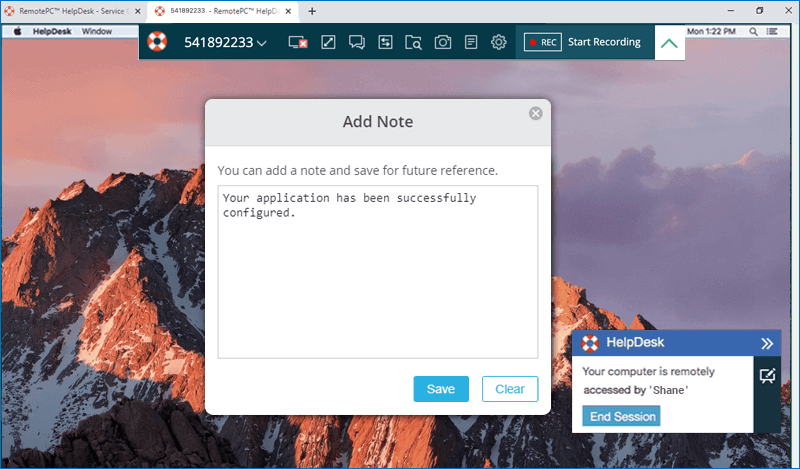
Yes, you can add notes during an ongoing remote support session and save it for future reference.
To add a note,
- Login to HelpDesk via the web browser and establish a remote connection with the customer's computer.
- Click to expand the menu bar in HelpDesk Viewer Lite.
- Click
 , enter your notes in the text field and click 'Save'.
To view saved notes,
- Click the 'Remote Access Logs' tab.
- Click
 against the particular Connection ID. The session notes would appear.
Yes, the remote computer's desktop screen can be scaled to fit within your computer window.
- Login to HelpDesk via the web browser and establish a remote connection with the customer's computer.
- Click to expand the menu bar in HelpDesk Viewer Lite.
- Click
 , mouse hover on 'View' and click 'Scale to fit'.

- To enter the full-screen mode, click
 .
.
You can also adjust the speed of the screen updates and quality at which the remote screen updates are transmitted with the 'Better Speed' and 'Better Quality' options respectively.
If the customer computer has multiple screens, you can conveniently toggle between them by clicking  on the menu bar. Alternatively, you can click and click a monitor name to view that individual monitor.
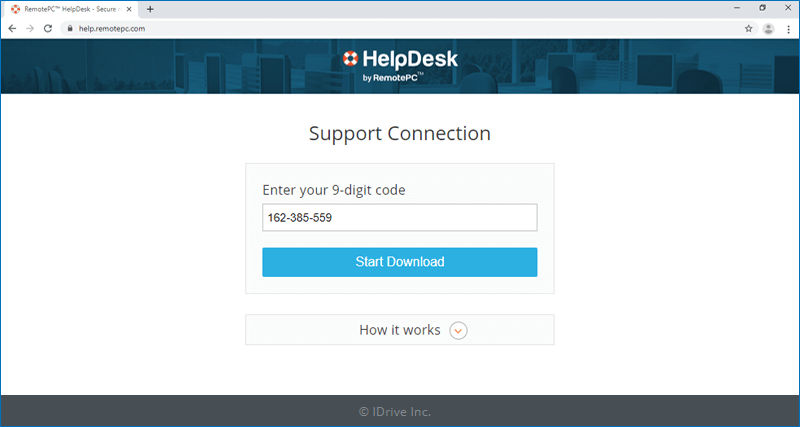
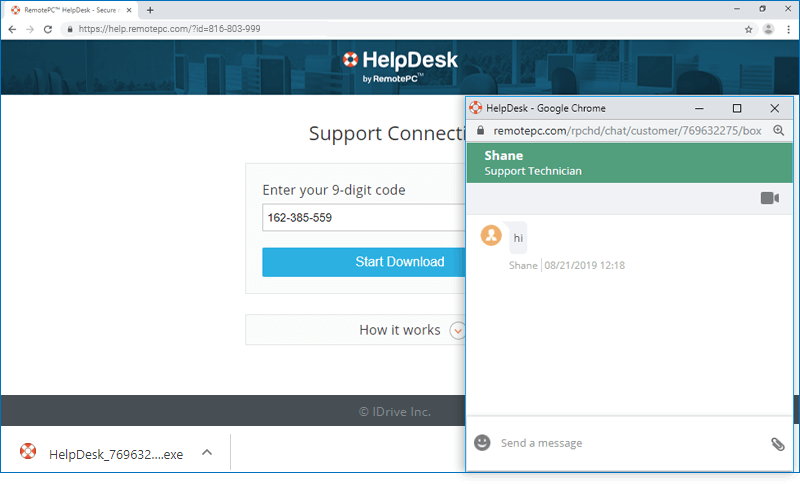
Once a Connection ID is created for your query in HelpDesk, you will receive a code or link from the technician.
- Open the link in a web browser or go to https://help.remotepc.com, and enter the shared code.
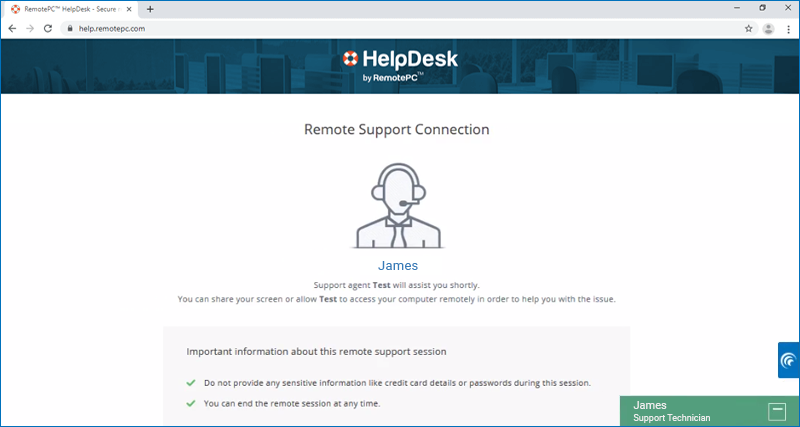
- The chat window will appear and the HelpDesk application setup downloaded on your computer.*

You can now chat with the technician and explain the issue at hand. Alternatively, once the application is installed on your computer, the technician can begin accessing your system.
Yes. Once you end the remote session, the setup on your computer will get automatically uninstalled.
HelpDesk Viewer Lite allows you to connect to a customer's computer from a web browser. During an ongoing remote support session, you can scale the remote computer screen, use Whiteboard, capture a snapshot of the computer screen, and lock the remote computer on session end.
No, you don't have to install any software to use HelpDesk Viewer Lite as it is a web-based application.
HelpDesk Viewer Lite is supported on the following browser versions:
- Chrome: 67 and above
- Safari: 11.0 and above
- Firefox: 60.0 and above
- Microsoft Edge: 42.17 and above
Note:
- IE, Opera and other browsers are not supported.
- By using the HelpDesk desktop application, technicians can perform all the remote access functions.
The two-step verification process enhances the security of your account and prevents access by unauthorized parties. Once two-step verification is enabled, in addition to your password, you will need to enter a verification code sent to your registered email address, while logging in to HelpDesk.
To enable two-step verification,
- Login to HelpDesk via the web browser.
- Click your username at the top-right of the screen.
- Select 'My Account' and navigate to the 'Security' tab.
- Click 'Enable Two-step Verification'.
- Enter the verification code sent to your registered email address and click 'Verify & Enable'.
To login after two-step verification is enabled,
- On the login screen, enter your username and password and click 'Login'. You will be prompted to enter a verification code sent to your email address.
- Enter the code and click 'Verify'.
Yes, you can enable two-step verification for new and existing technicians.
For new technicians:
While adding a new technician you can select the 'Enable two-step verification' checkbox in the 'Add Technician' popup.
For existing technicians:
You can open the 'Edit Technician Roles' popup by clicking  displayed against an existing technician, then select the 'Enable two-step verification' checkbox and click 'Save'.
Once you have enabled two-step verification for your technicians, on login they will be asked to verify their email address via OTP.
After the verification process is complete, they will need to enter a verification code sent to their registered email address during subsequent logins.
Yes, you can embed HelpDesk to a website.
To embed,
- Login to HelpDesk via the web browser.
- Click the username displayed on the top-right corner and click 'My Account'.
- Go to 'Customize HelpDesk' and click 'Copy Code'.
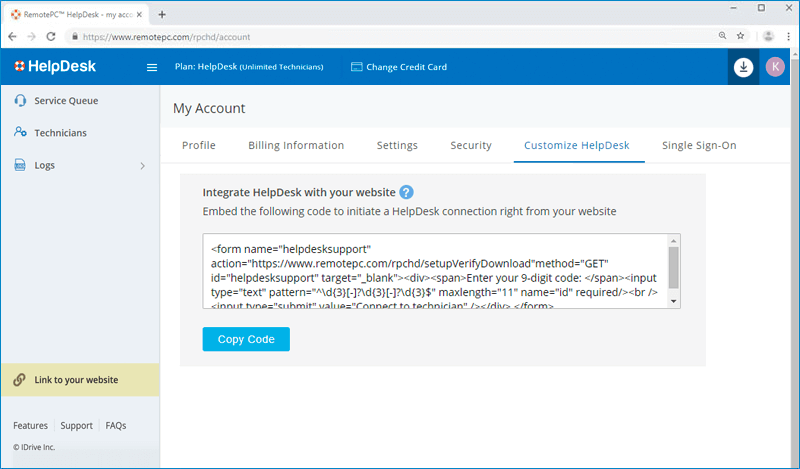
- Embed the sample code on your website between the <body></body> tags and save the changes.
You can also customize the font, text size, etc. to match the website.
Once the integration is successful, a HelpDesk connection can be initiated by entering the shared Connection ID on the website.